Categories
Common Synthesizer Controls Sound Design and Production Concepts

Mix Control

A mix control on a synthesizer refers to a knob or fader that allows the user to adjust the balance between different sound sources or elements within the synthesizer. This can include adjusting the balance between different oscillators, adjusting the balance between the dry and wet signals in a effects section, or adjusting the balance between different layers or elements in a patch.

For example, in a synthesizer with multiple oscillators, a mix control would allow the user to adjust the balance between the levels of each oscillator, which can be used to create a wide range of different sounds. Similarly, in a synth with a built-in effects section, a mix control can be used to adjust the balance between the dry, unprocessed sound and the wet, processed sound.

Mix control can also be used to adjust the balance between different layers or elements in a patch, such as between a lead sound and a background pad. This can be useful for creating more dynamic and expressive sounds, and for creating a sense of movement and evolution within a patch.

In summary, a mix control on a synthesizer is a knob or fader that allows the user to adjust the balance between different sound sources or elements within the synthesizer, such as different oscillators, dry/wet signals in effects section or different layers in a patch. It’s a powerful tool that can help to create a wide range of sounds and to add depth and dynamics to the sound.

Categories
Common Synthesizer Controls Sound Design and Production Concepts Synthesizer Concepts

Release

Release on a synthesizer refers to the amount of time it takes for a sound to fade out after a note is released. This parameter is typically found in the envelope section of a synthesizer, and it controls the amplitude envelope of the sound. The amplitude envelope is a graph that shows how the volume of a sound changes over time, and it is divided into four stages: attack, decay, sustain, and release.

The release stage is the final stage of the amplitude envelope, and it starts when a note is released, and it controls how long it takes for the sound to fade out after the note is released. A shorter release time will result in a sound that fades out quickly, while a longer release time will result in a sound that fades out slowly.

The release parameter is particularly useful for shaping the sound of sustained instruments such as pianos, strings and horns, and can be used to create a wide range of different effects. A short release time can be used to create a sharp and percussive sound, while a longer release time can be used to create a more natural and smooth sound. Additionally, Release can be used to create interesting sound effects like a “staccato” sound or a “legato” sound.

Categories
Common Synthesizer Controls Sound Design and Production Concepts

Sustain

On a synthesizer, sustain describes the period of time after the attack and decay phases of the amplitude envelope during which a sound is maintained at a constant volume. It regulates the amplitude envelope of the sound and is typically found in the envelope section of a synthesizer. The four stages of the amplitude envelope—a graph that depicts how a sound’s volume changes over time—are attack, decay, sustain, and release.

The sustain stage, which comes after the decay stage and is the third stage of the amplitude envelope, determines how long the sound will be held at a constant volume following the attack and decay stages. A sound will be held for a longer time when the sustain value is higher, while a sound will be held for a shorter time when the sustain value is lower.

The sustain parameter can produce various effects and is especially helpful for modifying the sound of percussive instruments like drums, pianos, and plucked instruments. It is possible to create a sound that lingers by using a high sustain value and a more transient sound by using a low sustain value.

Categories
Common Synthesizer Controls Sound Design and Production Concepts Synthesizer Concepts

Decay

On a synthesizer, decay is the time it takes for the sound to fade from its highest level, determined by the attack stage, to the sustain level. It regulates the amplitude envelope of the sound and is typically found in the envelope section of a synthesizer. The four stages of the amplitude envelope—a graph that depicts how a sound’s volume changes over time—are attack, decay, sustain, and release.

The decay stage, which follows the attack stage in the amplitude envelope, determines how long the sound will fade from its peak level to the sustain level. A sound will diminish more quickly with a shorter decay time than it will more gradually with a longer decay time.

The decay parameter can produce various effects and is particularly helpful for modifying the sound of percussive instruments like drums and plucked instruments. Longer decay times can create more natural and smooth sounds, while shorter decay times can produce sharp and percussive sounds.

Categories
Common Synthesizer Controls Sound Design and Production Concepts Synthesizer Concepts

Attack

Attack on a synthesizer refers to the time it takes for a sound to reach its peak level after a note is played. It regulates the amplitude envelope of the sound and is typically found in the envelope section of a synthesizer. The four stages of the amplitude envelope—a graph that depicts how a sound’s volume changes over time—are attack, decay, sustain, and release.

The first stage of the amplitude envelope is the attack stage, which begins when a note is played and determines how long it takes for the sound to reach its peak level. A sound will reach its peak level more quickly with a shorter attack time than with a longer one. A sound will reach its peak level more gradually.

The attack parameter can produce various effects and is particularly helpful for modifying the sound of percussion instruments, such as drums and plucked instruments. While a longer attack time can be used to produce a more gradual and smooth sound, a shorter attack time can be used to produce a sharp and percussive sound.

Categories
Common Synthesizer Controls

Resonance

On a synthesizer, resonance describes the accentuation of particular frequency components of a sound, usually in the context of a filter. It is a parameter that governs the peak of the filter’s frequency response and is located in the filter section of a synthesizer.

When the resonance is turned up, it emphasizes or creates a peak in the frequency response at the filter’s cutoff frequency, which can produce a distinctive “buzzy” or “ringing” sound. “Filter resonance” or “Filter emphasis” are terms used to describe this effect. This effect can be used to produce a wide variety of sounds, from soft to forceful, and it can be used to give a sound personality and definition.

According to the synth, the resonance can also be used to produce self-oscillation, which causes the filter to create a sine wave that gives the sound additional harmonic content. This can be used as a sound source to produce leads, basses, and other sounds in addition to interesting sound effects.

Categories
Common Synthesizer Controls

Frequency Cutoff

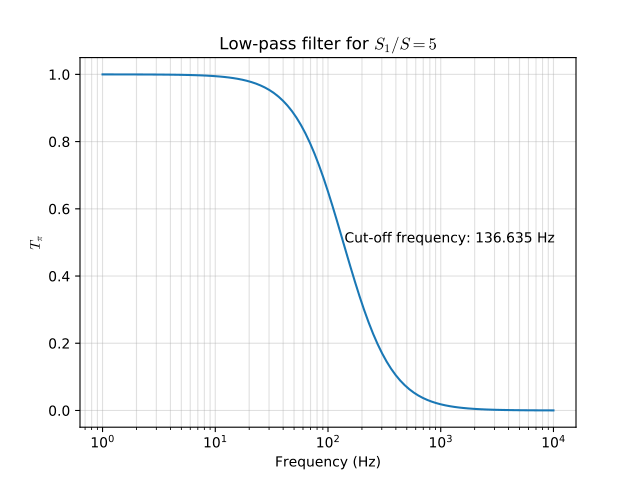
Frequency Cutoff on a synthesizer refers to the frequency at which a filter begins to reduce the amplitude of specific frequency components of a sound. It is a parameter that can be found in a synthesizer’s filter section that determines when the filter begins to affect the sound.

When a filter begins to reduce the amplitude of specific frequency components of the sound, this is known as the cutoff frequency. The filter will reduce the amplitude of the high-frequency components of the sound, producing a bassier sound when the cutoff frequency is set to a low value. The filter will reduce the amplitude of the low-frequency components of the sound, producing a brighter sound when the cutoff frequency is set to a high value.

The cutoff frequency is a powerful tool that can be used to create a wide variety of sounds, from bass-heavy to treble-heavy sounds, by shaping the tonal character of a sound. Additionally, real-time modulation of the cutoff frequency enables the creation of dynamic and expressive changes in the sound. This can produce various effects, including filter sweeps, wah-wah, and other modulation types, and it can be done by using an LFO or an envelope generator.

Categories
Sound Design and Production Concepts

Waveforms

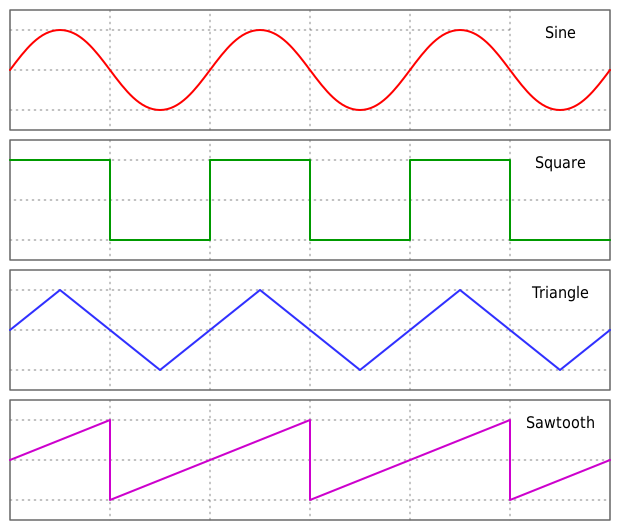
There are several different types of waveforms that can be used in synthesizers. The most common waveforms are:

  1. Sine wave: A smooth and pure waveform that has no harmonics and is characterized by its gentle, rounded shape. It is often used as a basic waveform for creating simple and classic synth sounds.
  2. Triangle wave: A waveform that has only odd harmonics and is characterized by its sharp and triangular shape. It is often used to create bell-like and metallic sounds.
  3. Sawtooth wave: A waveform that has all harmonics and is characterized by its saw-like shape. It is often used to create bright and cutting sounds and it is widely used in leads and bass sounds.
  4. Square wave: A waveform that has only odd harmonics and is characterized by its square shape. It is often used to create percussive and plucky sounds.
  5. Pulse wave: A waveform that is similar to a square wave but with the ability to adjust the duty cycle, meaning the proportion of time the waveform is at its peak level to the time it’s at the lowest level. It can create a wide range of sounds depending on the duty cycle adjustment.
  6. Noise: A random, unpitched audio signal that can be used as a sound source for percussive and experimental sounds
  7. Sample: A sound that has been recorded, digitized and stored in the synthesizer’s memory. It can be played back as an oscillator, it can be a wide range of sounds like drums, vocals, pianos, etc.
Categories
Sound Design and Production Concepts

Amplitude

On a synthesizer, the amplitude is the term used to describe the overall level or volume of the sound being produced. It can be adjusted using a fader or knob and is typically expressed in decibels (dB).

Depending on the synth, the amplitude can be controlled at the oscillator level, the envelope generator level, the mixer level, or the output level during various stages of sound production.

A patch can have different loudness levels for each oscillator by using amplitude to control the volume of each oscillator at the oscillator level. Amplitude is managed at the envelope generator level by the envelope generator, which modifies the sound’s amplitude over time. The attack, decay, sustain, and release stages of the envelope generator are all where the amplitude is controlled.

After all the oscillators have been blended, amplitude controls the overall volume of the sound at the mixer level. This is useful for balancing the levels of various components in a patch. Amplitude on the output level regulates the sound’s final volume before it is sent to the synth’s output, which is useful for adjusting the sound’s overall loudness.

See also

Categories
Sound Design and Production Concepts

Frequency

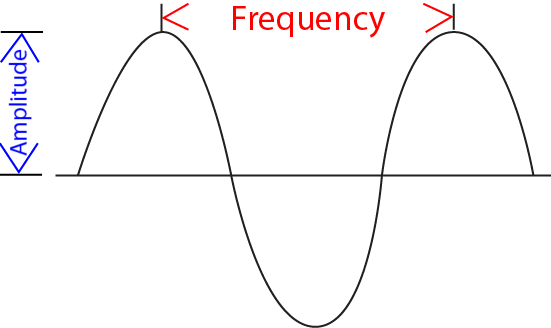
Frequency on a synthesizer refers to the number of times a waveform oscillates within one second, measured in hertz (Hz). It is a parameter that governs the pitch of the sound being produced and is located on the oscillator section of a synthesizer.

In a synthesizer, each oscillator has a frequency control that enables the user to adjust the oscillator’s pitch concerning a musical scale. A synth’s frequency can be set to a specific number, such as 440Hz, which is the pitch of the note A in standard tuning, or to a particular note, such as “A4”, which is also tuned to 440Hz. Some synths, such as those with a pitch bend wheel or a pitch modulation control, let the user set the frequency more flexibly.

One of the critical factors determining how a synth sounds are its oscillator’s frequency, which is used to produce a wide variety of sounds. Higher frequencies produce higher-pitched sounds, while lower frequencies produce sounds with a lower pitch. Furthermore, real-time frequency modulation enables the creation of dynamic and expressive changes in the sound. This can create various effects, including vibrato, pitch bends, and other modulation types, and it can be done by using an LFO or an envelope generator.

See also: